 Electronics")
WiFiBee Setting Guide
The WiFiBee module has two modes of operation: Data mode and Command mode. In data mode, the module can accept incoming connections or initiate outgoing connections. To configure parameters and/or view the current configuration, you must put the module into Command mode (also called Configuration mode).
Before we use the WiFiBee module, we always need configure it first.
Configure it in AP mode
1. Issue commands to the module
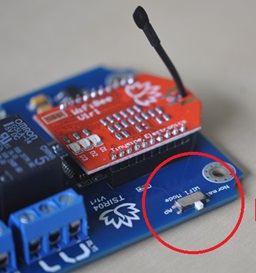
If your relay board have AP/Normal setting switch. You can also configure the WiFibee wirelessly. Power off relay board->set switch to AP position->power on->WiFibee LEDs blink in sequence.
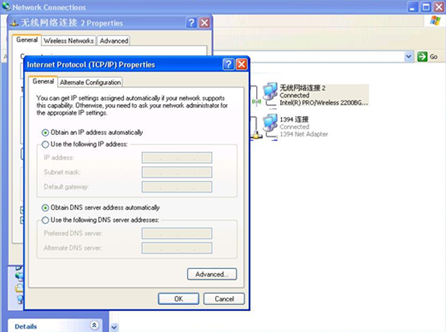
- Set your computer Obtain an IP address automatically.
- From your computer, You will find a new wireless network named Wifly-GSX-XX or Wifly-EZX-XX(AP mode)
- Connect to the WiFly-GSX-XX (WiFly-EZX-XX) network. This is an open network that does not require a pass phrase or pass key.
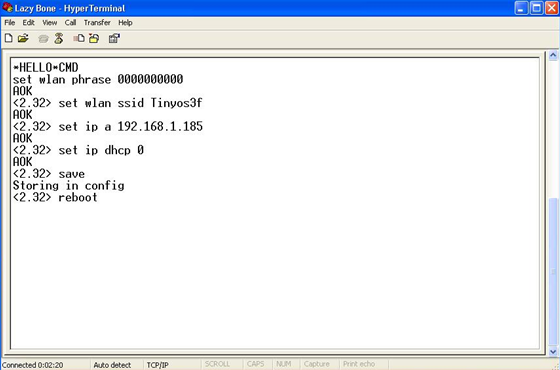
- Open Hyper terminal connect server 1.2.3.4:2000
- Sending the escape sequence $$$ causes the module to enter command mode. WiFiBee module reply CMD
- send commands
set wlan phrase <your wpa password>
set wlan ssid <your ssid>
set wlan join 1
set ip a <your IP>
set ip dhcp 0
set sys printlvl 0
set comm idle 30
save
reboot
2. Use config tool program
we released a simple WiFiBee AP mode config tool. You can use it to set your wifibee/wifly in AP mode easily!
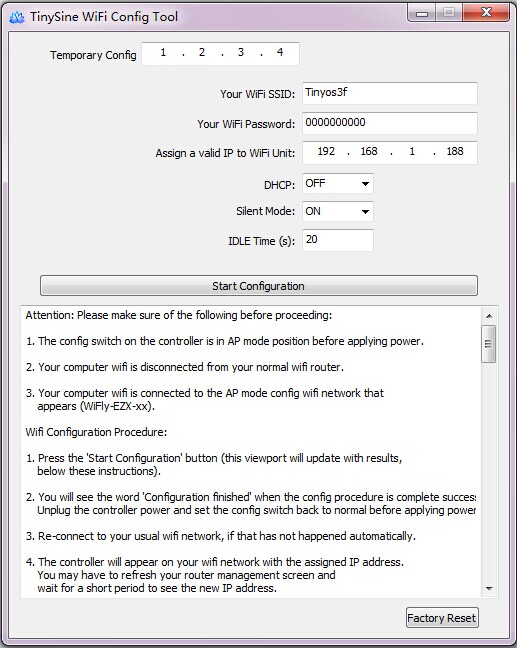
- Open the TinySine WiFibee config tools.exe
- Input your network SSID, Password, and assign a valid IP to the WiFi module.
- The config switch on the controller is in AP mode position before applying power.
- Your computer wifi is disconnected from your normal wifi router.
- Your computer wifi is connected to the AP mode config wifi network that appears (WiFly-EZX-xx).
- Press the 'Start Configuration' button.
- You will see the word 'Configuration stopped' when the config procedure is complete successfully. Unplug the controller power and set the config switch back to normal before applying power.
After configuration. Your WiFibee module should joined your wifi network. D1 slow Blink. If you want reset the module to factory setting. Just click "Factory Reset" button.
Configure it by serial Port
If you have a USB adapter in hand. You can configure the WiFiBee module by serial port. Plug your WiFibee or Wifly on your USB adatper. Connect the USB adatper to your computer. (WiFiBee LEDs state D1,D3 blink). Install FT232RL drivers. A new COM port will appears in the device manager. Here are 2 ways to configure the module.
1. Issue commands to the module
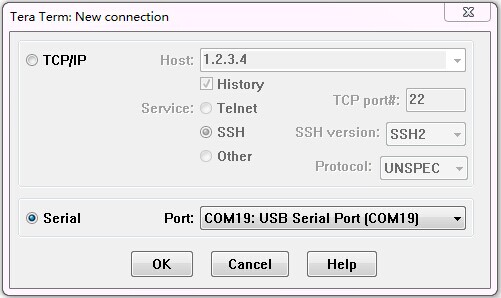
- Download Tera Term and install it
- Open TeraTerm, choose correct serial port.
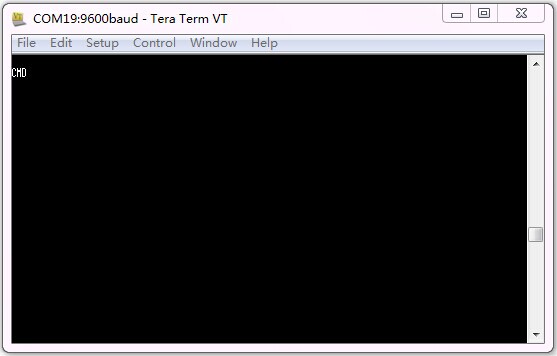
- Sending the escape sequence $$$ causes the module to enter command mode. WiFiBee module reply CMD
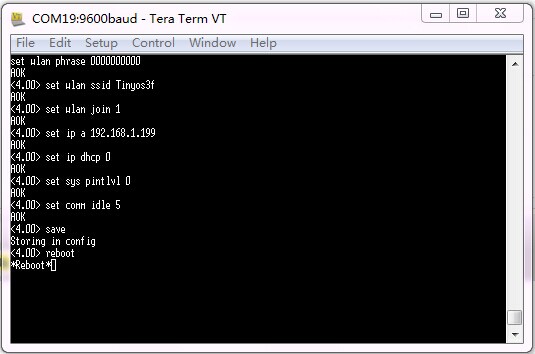
- Sending configuration commands
set wlan phrase <your wpa password>
set wlan ssid <your ssid>
set wlan join 1
set ip a <your IP>
set ip dhcp 0
set sys printlvl 0
set comm idle 5
save
reboot
- WiFibee will be joined your home WiFi network.(D1 slow blink)
2. Use setting tool program
we released a simple WiFiBee setting tool. You can use it to set your wifibee/wifly easily!
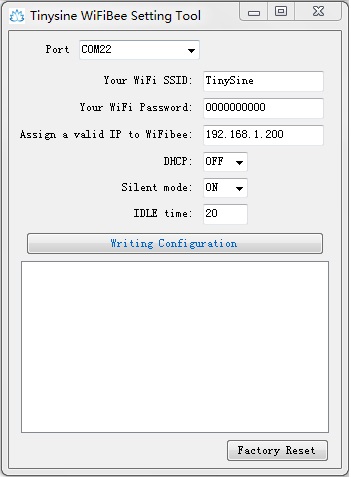
- Open the TinySine WiFibee setting tools.exe. Select the correct COM port.
- Input your network SSID, Password, and assign a valid IP to the WiFi module.
- Click writing configuration. All done!
After configuration. Your WiFibee module should joined your wifi network. D1 slow Blink. If you want reset the module to factory setting. Just click "Factory Reset" button.