 Electronics")
TinySine 3G Arduino Shield Qickstrat Guide
TinySine SIM5320X 3G shield has better coverage, GSM backwards-compatibility and even sports a built-in GPS module for geolocation & asset tracking. This all-in-one cellular phone module with that lets you add location-tracking, voice, text, SMS and data to your project in a single shield.
This shield packs a surprising amount of technology into it's little frame. At the heart is a powerfull GSM cellular module with integrated GPS. On its own, this shield can't do anything. It requires a microcontroller to drive it! We suggest and use an Arduino but any 3-5V microcontroller with a UART can send and receive commands over the RX/TX pins.
Hardware and Software required:
STEP1: Install Library
To begin reading sensor data, you will need to Install Library as follows:
- Download Arduino Library and unzip it.
- Copy the Adafruit_FONA folder to Arduino libraries folder. Typically in your (home folder)/Documents/Arduino/Libraries folder.
- Re-start the Arduino IDE if it is currently running.
STEP2: 3G Baud Adjustment
If you have a Tinysine 3G shield, the first time you use it you may need to run the FONA3G_setBaud example to set the baud rate manually to 4800bps rather than 115200.
- Stack your 3G shield on the Arduino main board,then plug in the USB cable from your computer to the Arduino board.
- We'll be using software serial to talk with the module,set TX-2,RX-3 on the 3G shield. And press the small POWER button for 4 seconds to power on.
- Select your board type and serial port from the Tools menu,Open up File->Examples->Adafruit_FONA->FONA3G_setbaud and upload to your Arduino wired up to the module.
- Once uploaded to your Arduino, open up the serial console at 115200 baud speed to begin the tester sketch.

STEP3: Send SMS Test
In order to use the phone parts of 3G shield you will need a 2G or 3G Mini SIM card. Luckily, Nearly any cell phone shop can sell you a SIM card. You can get a pre-paid or post-paid SIM but we kinda like the pre-paid kind.
Note: Micro SIMs won't fit - so make sure its a "Mini" SIM. Sometimes these are just called plain "SIM" cards since the huge-size SIMs are rarely used. Mini SIMs are 1" x 0.6" / 25mm x 15mm. these are by far the most common size.
- Insert a Mini SIM card in the SIM card holder on the back, and connect the GSM antenna.
- Put the 3G shield on the Arduino board,then plug in the USB cable from your computer to the Arduino board.
- We'll be using software serial to talk to the module,we choose TX—2,RX—3on the 3G shield. And press the small POWER button for 5 seconds to power on.
- Select your board type and serial port from the Tools menu, Open up File->Examples->Adafruit_FONA->FONAtest and upload to your Arduino wired up to the module.
- Once uploaded to your Arduino, open up the serial console at 115200 baud speed to begin the tester sketch.
- Enter the “s”in the send column and click “send”.Serial monitor will print output “Send to #”,then enter the phone number you want to send and click “send”.finally enter the message you want to send and click ”send”.
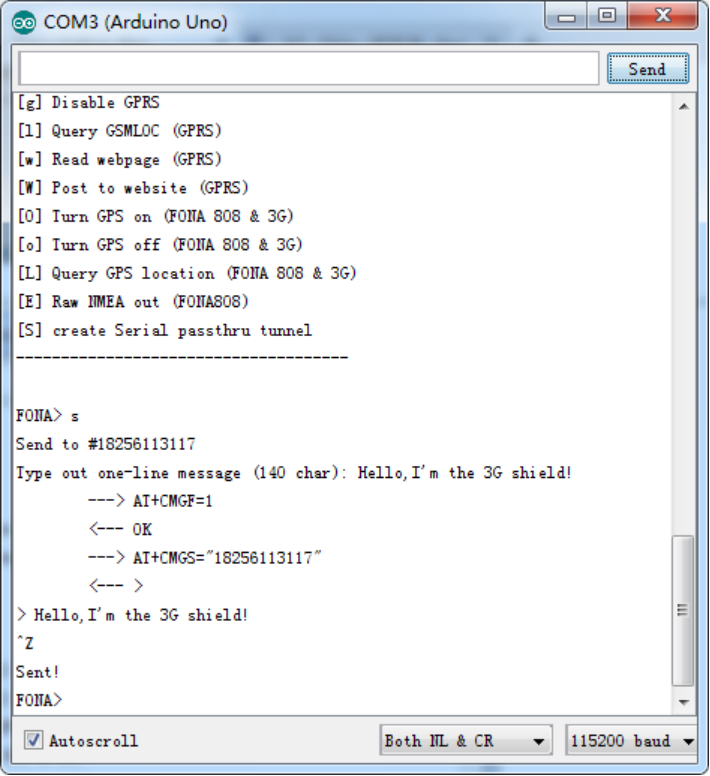
Note: Make sure you also have Both NL & CR for the serial command sender option. This means when you send data to the Arduino via the console, it will put a newline/return at the end.
STEP4: GPS Test
GPS does work without a SIM but of course you cannot send or receive texts, calls, etc! We strongly recommend using an active antenna with the GPS(External GPS Antenna (needs a uFL to SMA adapter too)), while we could get a fix with a passive antenna it took a long time.
Note:For more rapid and accurate positioning,please put the GPS antenna outside or around the place where there is no obstacle to prevent the search to locate the satellite.
- Connect the GPS antenna to the 3G shield and Put it on the Arduino board,then plug in the micro USB cable from your computer to the 3G shield.
- Power supply to the Arduino board using 9V DC power and press the small POWER button for 4 seconds to power on.Then the computer will recognize a multi-type USB connection. If you are the first time to download the drive and choose to install the appropriate driver according to your computer system.
Open device manager there are 4 devices created:
- A communication port
- A Sim Tech HS-USB diagnostics 9000
- A Sim Tech HS-USB NMEA 9000 (this is the raw GPS NMEA output)
- A Sim Tech HS-USB AT port 9000 (this is how you can send commands to the module!)

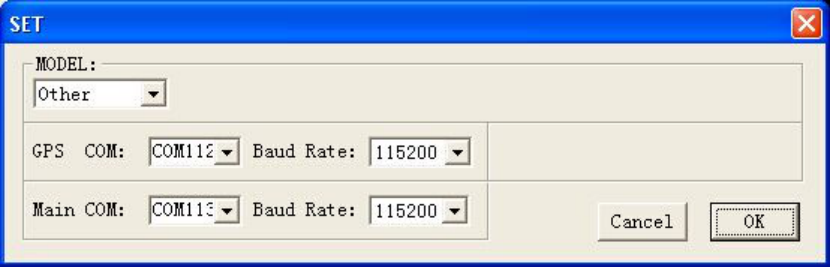
3.Download the SIMCom NMEA GPS DEMO and open it,click![]() set the corresponding port number and MODEL choose Other.
set the corresponding port number and MODEL choose Other.
4. Enter the “AT+CGPS=1”in the command column and click “send”,then wait a moment can view the current location of the longitude,latitude,altitude etc.
