Electronics")
How to Restore AudioB Plus Module Default Settings
All of our Bluetooth audio amplifier and Bluetooth audio receiver user can change the Bluetooth settings by themself. Sometime, It will cause problems if you set a wrong parameters. This article will introduce how to restore the Bluetooth module to default factory settings.
There are 2 ways to restore the Bluetooth module settings:
- Write the bluetooth configuation file(.PSR file) into the bluetooth module
- Rewrite the firmware into the bluetooth module
The following steps will introduce how to do it.
Hardware and Software required:
Bluetooth configuation file programming:
- Download Bluesuite2.5.0 and install it
- Download CSRXX_ROM_ConfigTool and install it (CSR8635)
- Download CSRA64xxx and CSRA63xxx Tools and install it (CSRA64215)
- .psr file: CSR8635, CSRA64215
Firmware programming:
- Download E2PROM and install it (CSR8635)
- Download BlueModify and install it (CSRA64215)
- AudioB plus firmware(CSR8635),
- APTX AudioB plus firmware(CSRA64215)-Analog output
- AudioB I2S module firmware(CSRA64215)-I2S output
How to write the .PSR file into the Bluetooth module
Step1:
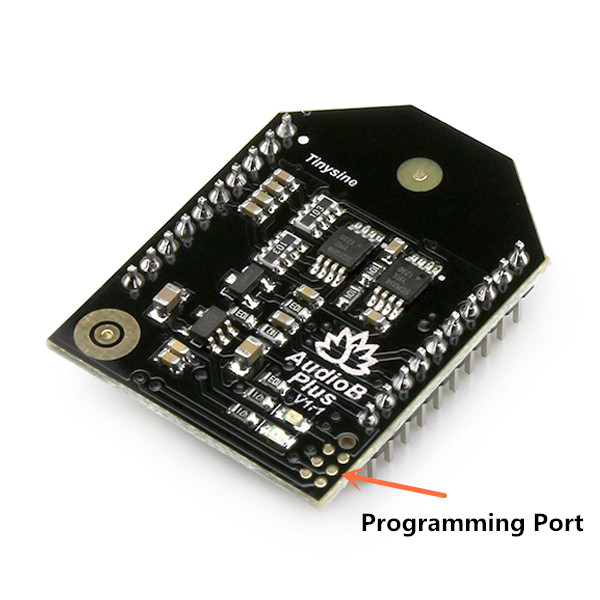
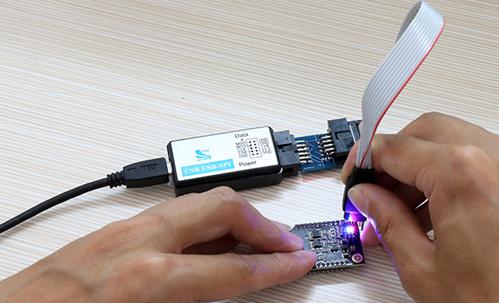
Connect the CSR USB-SPI programmer and Tag-Connect line with a AudioB Plus convert board, then connect CSR USB-SPI to your computer by a mini USB cable and windows will auto detect it and install the drivers.
Step2:
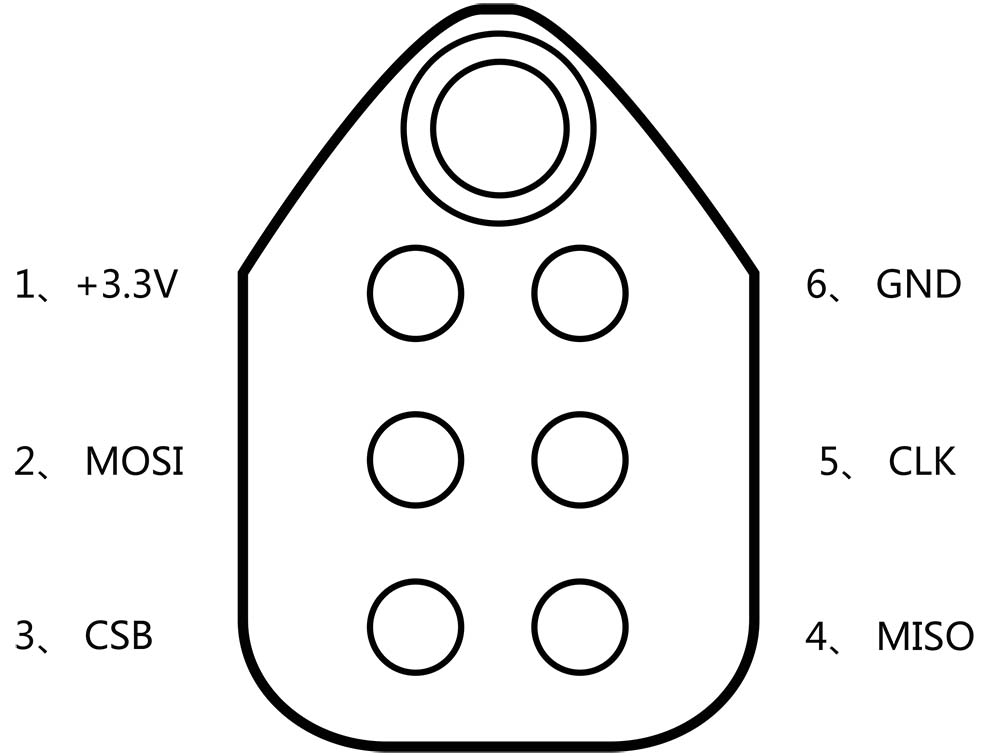
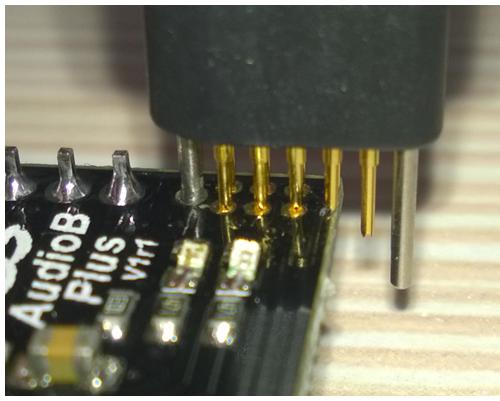
Connect TC2050-IDC-NL’s connector to AudioB plus programming port. You need to locate the single steel alignment pin of the connector into the single hole of the PCB footprint, then press down softly to engage the spring-pin contacts. Make sure the first 6 pins have a good contact with the corresponding pads. Then the blue led and red led will flashes alternately.
Step3:
We have 2 kinds of AudioB plus module. The basic AudioB plus(based on CSR8635) and APTX AudioB plus(based on CSRA64215).
For basic AudioB plus(CSR8635)
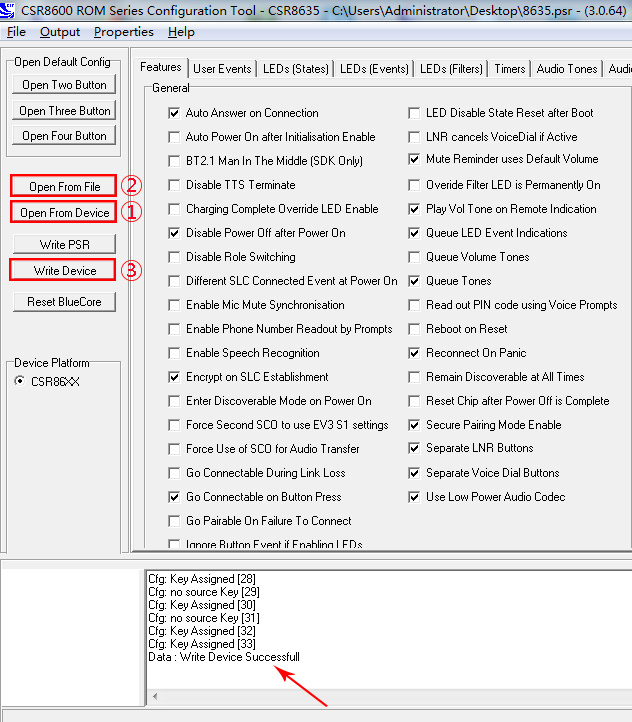
Please open Configuration Tool. Click "Open From Device", wait a moment, the software will detect the chip model. If the identified chip model is CSR8635, you can proceed to the next step, otherwise try again. Download .PSR file for CSR8635 and save it in a place where you can find later. Click "Open From File", then find and open the configuration file with psr suffix. Yes, that is the file you saved before. At last, Click "Write Device", wait for a while the configuration file will be programmed to the chip, and at the same time below the interface will show the success of programming information.
For APTX AudioB plus(CSRA64215)
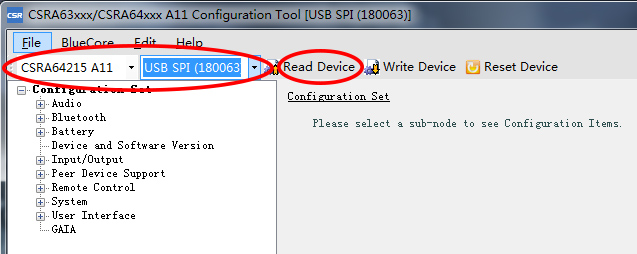
If the module chip model is A64215, then open CSRA64xxx Configuration Tool. Choose "CSRA64215 A11" and "USB SPI(180063)" on the top left, then click "Read Device".
Download Configuration file for A64215 and save it in a place where you can find later. Click "File" and select "Open PSR", then find and open the configuration file with psr suffix. Yes, that is the file you saved before.
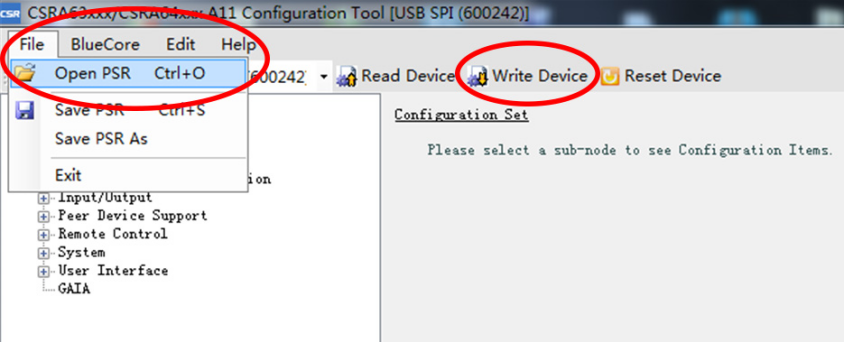
Finally, click "Write Device", wait for a while the configuration file will be programmed to the chip. Rewrite the .PSR file can fix most the of the setting problems. It can recover the BT name, Audio gains or other setting problems. But, if your module still not work correct. You can try to re-write the firmware.
How to update the Bluetooth module firmware
Step1:
Connect the CSR USB-SPI programmer and Tag-Connect line with a AudioB Plus convert board, then connect CSR USB-SPI to your computer by a mini USB cable and windows will auto detect it and install the drivers.
Step2:
Connect TC2050-IDC-NL’s connector to AudioB plus programming port. You need to locate the single steel alignment pin of the connector into the single hole of the PCB footprint, then press down softly to engage the spring-pin contacts. Make sure the first 6 pins have a good contact with the corresponding pads. Then the blue led and red led will flashes alternately.
Step3:
We have 2 kinds of AudioB plus module. The basic AudioB plus(based on CSR8635) and APTX AudioB plus(based on CSRA64215).
For basic AudioB plus(CSR8635)
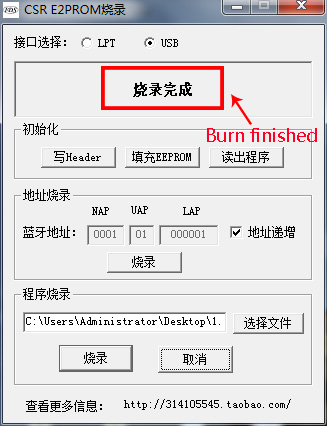
If the module chip model is CSR8635, download firmware for CSR8635 and save it in a place where you can find later. Download Firmware programming tools “ E2PROM” and unzip the ZIP file. Open the unzipped folder, you will see a software named E2PROM.exe and open it.
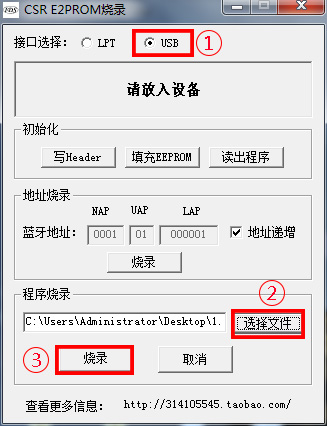
Select the USB option in the top interface of the software, and then click ![]() to find and open the file with dump suffix. Yes, that is the file you saved before. At last, click
to find and open the file with dump suffix. Yes, that is the file you saved before. At last, click ![]() ,wait for a while the firmware will be programmed to the chip, and at the same time you will see the “Burn finished” information at the top of the software interface.
,wait for a while the firmware will be programmed to the chip, and at the same time you will see the “Burn finished” information at the top of the software interface.
For APTX AudioB plus(CSRA64215)
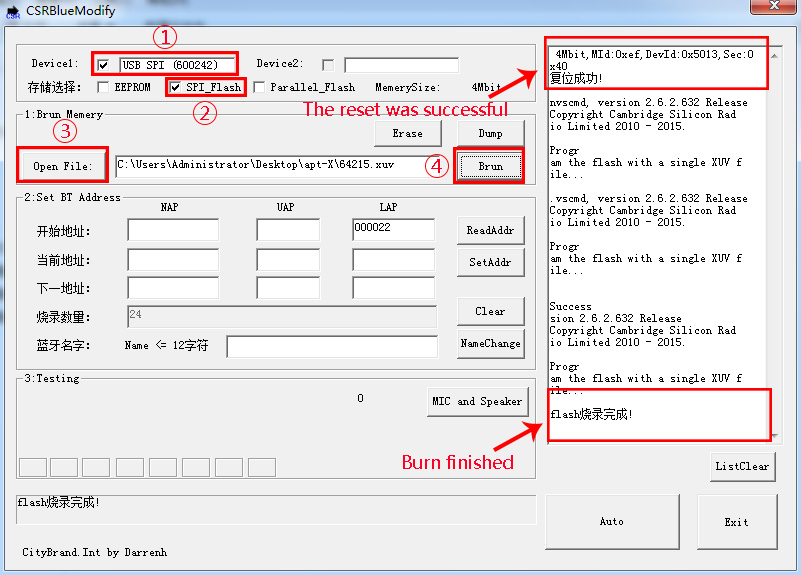
Please download firmware for CSRA64215 and save it in a place where you can find later. Download firmware programming tools “ BlueModify” and unzip the ZIP file. Open the unzipped folder, you will see a software named BlueModify.exe and open it. Select the ”USB SPI“ option and select “SPI_flash” for storage mode in the top interface of the software, at the same time on the right side of the information bar you will see the module reset information. If you do not see this information, then it indicates that the module is not reset successfully, please repeat the above steps. Click "Open File" to find and open the file with xuv suffix. Yes, that is the file you saved before. Finally, click "Burn", wait for a while the firmware will be programmed to the chip. And also you can see the “Burn finished” information in the interface.